After making a blog, there are some basic/necessary settings which you have to apply on your blog.
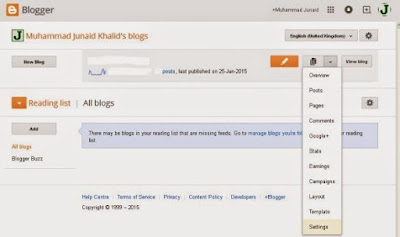
1. First of all go to www.blogger.com and sign in with your Gmail ID. After signing in, there appears
blogger main page or blogger Dashboard as in the image below.
blogger main page or blogger Dashboard as in the image below.
"Settings" (As shown in the image above).
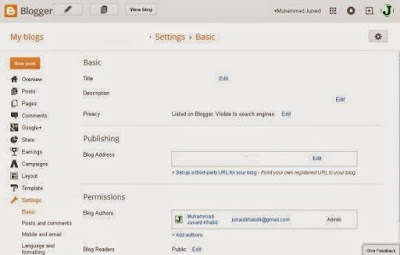
3. After clicking on "Settings", you will see the following page as in the image below.
4. On this page, you will see different settings. First of all Select your blog's title. Select a suitable and unique title according to your blog's content. After selecting the title, click on "Save Changes".
5. Now Click on "Description" and then 'Edit'. Select a suitable description for your blog.
Such as "A Blog about Making money online", "Helping new Bloggers", etc. The description must also be according to the content.
6. After selecting description, go to "Privacy". Click on edit and you will see two options:
a. Add your blog to our listings?
b. Let search engines find your blog?
For both options, select 'Yes'.
7. Next is the "Blog Address". Select a suitable address for your blog. For example genuineonlineearnings.blogspot.com The blog address should contain your blog's title for better results.
8. After selecting Blog address, the next options are "Blog Authors" and "Blog Readers".
Select blog author by giving your email address in the field. In Blog Readers option, select "Public".
After doing this, you will finish the first page of your blog's settings. Now on the left side of the page, you will see other settings like 'Posts and comments', 'Mobile and email', Language and Formatting, Search preferences and other. Go to "Posts and Comments".
9. There are three options for Posts setting.
a. Show at most
b. Post Template
c. Showcase images with Lightbox
In "Show at most", Choose the no. of posts you want to show on your your blog's main/home page.
In "Showcase images with Lightbox", select "Yes".
10. In "Comments", Select your comment location as "Embedded". Now there is an option of "Who can comment". Select "Anyone" for your blog's promotion.
In "Comment moderation" there are three options.
a. Always
b. Sometimes
c. Never
I suggest the option "Never".
11. Select 'Yes' for "Show word verification" and for "Show Backlinks, select "Show". Click on 'Save Setting" on the upper right side of the page.
Now your "Posts and Comments" settings will be saved. Leave "Mobile and Email" settings and go to "Language and Formatting".
12. In Language, select the language for your blog. If you want to select "English', select English(United Kingdom).
13. In Formatting, there are four options.
a. Time zone
b. Date Header Format
c. Timestamp Format
d. Comment Timestamp Format
Choose the settings according to your own choice.
14. Now go to "Search Preferences". In this setting, first of all select the Meta tags for your blog. You can use the blog description as your Meta tag description.
15. Leave the option of "Errors and Redirections" as this is only used when you shift your blog to another hosting Service or when you want to change your blog address.
16. Now there comes an important setting "Custom robots.txt" and "Custom robots header tags". Don't touch "Custom robots header tags" settings and leave it as it is.
For "Custom robots.txt", first of all enable it and then copy and paste the following code in the space given:
User-agent: *
Disallow: /search
Allow: /
Sitemap:http://yourblogaddress/atom.xml?redirect=false&start-index=1&max-results=500
Disallow: /search
Allow: /
Sitemap:http://yourblogaddress/atom.xml?redirect=false&start-index=1&max-results=500
Remember to replace "yourblogaddress" with your blog url and click on 'Save changes'. This will boost your blog's SEO and blog's position in google search engine.
You have done! This is all about your blog settings. But there remains another important setting which you have to do in order to have your blog appeared in Google search engine. In this setting, you have to submit your blog's sitemap to google webmaster tools. For this purpose read my post: How to Submit Your Blogger Sitemap to Google Webmaster Tools


No comments:
Post a Comment