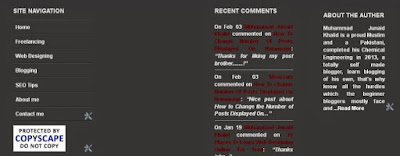
A blog footer is located at the bottom of a blog. Blog footer can be used for various purposes such as:
1. You can place your blog links in footer.
2. You can place your blog sitemap link.
3. You can place Recent Comments widget in footer.
4. Information about you.
5. Copyright statement
6. Email Subscription box
How to add the Multi Column Footer to Blogger?
1. Go to blogger dashboard, click on the arrow pointing downward on the right upper corner of the page as shown in the image below:
2. Select Template from the list and then select Edit HTML.
3. Search for ]]></b:skin> in the HTML document and paste the following CSS code:
#lower {
margin:auto;
padding: 0px 0px 10px 0px;
width: 100%;
background:#333333;
}
#lower-wrapper {
background:#333333;
margin:auto;
padding: 20px 0px 20px 0px;
width: 960px;
border:0;
}
#lowerbar-wrapper {
background:#333333;
float: left;
margin: 0px 5px auto;
padding-bottom: 20px;
width: 23%;
text-align: justify;
color:#ddd;
font: bold 12px Arial, Tahoma, Verdana;
line-height: 1.6em;
word-wrap: break-word;
overflow: hidden;
}
.lowerbar {margin: 0; padding: 0;}
.lowerbar .widget {margin: 0; padding: 10px 20px 0px 20px;}
.lowerbar h2 {
margin: 0px 0px 10px 0px;
padding: 3px 0px 3px 0px;
text-align: left;
border:0;
color:#ddd;
text-transform:uppercase;
font: bold 14px Arial, Tahoma, Verdana;
}
.lowerbar ul {
color:#fff;
margin: 0 auto;
padding: 0;
list-style-type: none;
}
.lowerbar li {
display:block;
color:#fff;
line-height: 1.6em;
margin-left: 0 !important;
padding: 6px;
border-bottom: 1px solid #222;
border-top: 1px solid #444;
list-style-type: none;
}
.lowerbar li a {
text-decoration:none; color: #DBDBDB;
}
.lowerbar li a:hover {
text-decoration:underline;
}
.lowerbar li:hover {
display:block;
background: #222;
}
4. Now search for </body> and paste the following HTML Code just above </body>.
<div id='lower'>
<div id='lower-wrapper'>
<div id='lowerbar-wrapper'>
<b:section class='lowerbar' id='lowerbar1' preferred='yes'>
</b:section>
</div>
<div id='lowerbar-wrapper'>
<b:section class='lowerbar' id='lowerbar2' preferred='yes'>
</b:section>
</div>
<div id='lowerbar-wrapper'>
<b:section class='lowerbar' id='lowerbar3' preferred='yes'>
</b:section>
</div>
<div id='lowerbar-wrapper'>
<b:section class='lowerbar' id='lowerbar4' preferred='yes'>
</b:section>
</div>
<div style='clear: both;'/>
</div> </div>
5. Click on Save Template and its Done! Now check your blog and you will see a beautiful footer at the bottom.
You also want to read Popup Email Subscription Box With Jquery
Popup Email Subscription Box With JQuery


No comments:
Post a Comment